🍅 Introduction: Transform Plastic Cans Into Productive Tomato Gardens
Fresh, juicy tomatoes are a staple in kitchens worldwide, but what if you don’t have a backyard or garden bed? Urban gardeners and apartment dwellers are now discovering a simple, cost-effective solution: growing tomatoes in plastic cans and bottles.
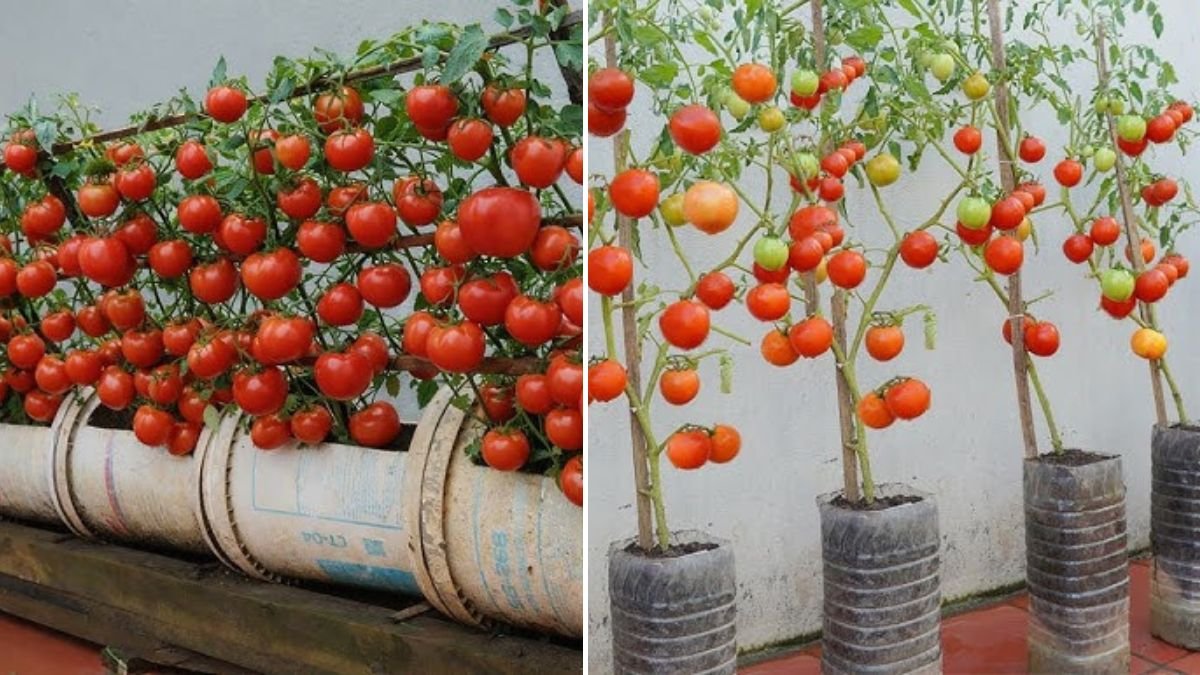
This method not only saves space and money but also allows you to produce high-quality, fresh tomatoes in small areas such as balconies, terraces, and rooftops. By repurposing plastic containers, you reduce waste and create a sustainable, space-efficient tomato garden.
Recent trends highlight how urban growers are achieving bountiful yields in small containers, proving that traditional garden beds aren’t required to grow healthy, fruit-bearing tomato plants. (ColabaMarket)
🌿 Why Container Gardening Works for Tomatoes
Tomatoes are ideal for container gardening because they adapt well to limited soil volumes as long as roots have room to grow, and plants receive adequate sunlight, water, and nutrients. Container gardening allows flexibility in small spaces and makes it easier to control growing conditions.
Container gardening is particularly effective when using plastic cans, buckets, or bottles, which are inexpensive, widely available, and easy to handle. Vertical arrangements or hanging bottles increase air circulation and save space, making it possible to grow several plants even in compact urban settings. (Yard and Garden, Iowa State Extension)
🪣 Step 1: Selecting the Right Containers
Plastic cans and bottles vary in size, and your choice affects the root growth and fruit yield:
- Small bottles (1.5–2L): Ideal for cherry tomatoes or small varieties. These can be hung vertically or placed on shelves.
- Large plastic cans or buckets (5–10L): Suitable for standard or indeterminate tomato varieties, allowing more soil for root growth.
Clean the containers thoroughly and remove labels to prevent mold and mildew buildup. Ensure they are structurally stable to support the plant as it grows. (ColabaMarket)
🔹 Step 2: Create Proper Drainage
Drainage is essential to prevent waterlogging and root rot. Use a drill, heated nail, or sharp tool to make 4–6 drainage holes in the bottom of your containers.
For vertical hanging bottles, you can also make small holes along the sides near the bottom to prevent stagnant water from collecting and to improve aeration. Proper drainage ensures healthy roots and higher fruit production.
🌱 Step 3: Prepare a Fertile Soil Mix
Tomatoes thrive in a light, nutrient-rich growing medium. A recommended mix for containers includes:
- 40% garden soil
- 30% compost or well-rotted manure
- 20% cocopeat or peat moss
- 10% sand or perlite for aeration
This mixture provides essential nutrients, retains moisture, and prevents compaction. Using compost ensures a continuous supply of organic nutrients, which is vital for container-grown tomatoes. (ColabaMarket)
🌱 Step 4: Planting Tomato Seedlings
You can start seeds directly in containers or transplant seedlings with 2–3 true leaves:
- Transplant depth: Bury the stem partially to allow adventitious roots to form, strengthening the plant.
- Spacing: Ensure there is enough space for airflow between containers, especially when growing multiple plants in a small area.
Healthy seedlings establish quickly and adapt well to container life, producing more flowers and fruit.
🌞 Step 5: Sunlight and Placement
Tomatoes require 6–8 hours of direct sunlight daily. Place containers on balconies, terraces, or near windows that receive ample sun.
For vertical or hanging systems, rotate containers occasionally to ensure even light exposure for all plants. Adequate sunlight ensures vigorous growth, flower formation, and optimal fruit ripening.
💧 Step 6: Watering and Care
Container-grown tomatoes dry out faster than garden soil, so regular watering is critical:
- Water in the morning to minimize fungal risks.
- Keep the soil consistently moist but not waterlogged.
- Use mulching or shredded leaves on top to retain moisture.
Drip irrigation can be adapted to container setups, providing slow, consistent water supply directly to the roots, improving plant health and reducing water waste.
🌿 Step 7: Fertilization
Containers contain limited soil, so additional nutrients are necessary:
- Liquid fertilizers: Apply a balanced liquid fertilizer every 2–3 weeks.
- Organic boosters: Banana peel water or diluted compost tea provides potassium and micronutrients to promote flowering and fruiting.
Fertilization supports robust growth, increases flower formation, and boosts tomato yield.
✂️ Step 8: Pruning and Training
Pruning helps containers produce more fruit with less foliage:
- Remove lower leaves to improve airflow and prevent disease.
- Pinch off side shoots (suckers) on indeterminate varieties to direct energy toward fruiting.
- Tie stems to stakes or supports in larger cans to prevent bending or breakage under fruit weight.
Regular pruning encourages higher quality, abundant tomatoes even in limited space.
🐛 Step 9: Pest and Disease Management
Container-grown tomatoes are susceptible to pests such as aphids, whiteflies, or spider mites. Organic control methods include:
- Neem oil or soap sprays
- Companion planting with basil or marigolds
- Regular inspection and removal of affected leaves
These practices ensure healthy plants without harmful chemicals.
🍅 Step 10: Harvesting
- Harvest tomatoes when fully colored but firm.
- Regular harvesting encourages plants to produce additional flowers and fruits.
- For cherry tomatoes, frequent picking can double the yield compared to letting fruits ripen all at once.
Proper timing maximizes total harvest from each container.
🌎 Benefits of Growing Tomatoes in Plastic Containers
- Space-saving: Ideal for urban gardens or small balconies.
- Cost-effective: Reuses plastic bottles and cans.
- Mobility: Containers can be moved to follow sunlight or avoid harsh weather.
- Sustainability: Reduces plastic waste while providing fresh, homegrown food.
This method is increasingly popular among apartment dwellers, urban gardeners, and eco-conscious growers.
📌 Authoritative Sources
- Iowa State Extension – Growing Tomatoes in Containers: Guidance for container size, soil mix, and care (link)
- SharingIdeas – How to Grow Tomatoes Upside Down in Plastic Bottles: Creative vertical techniques (link)
- ColabaMarket – Grow Hundreds of Cherry Tomatoes in Plastic Bottles: Step-by-step container gardening (link)
- IndiaTimes – Tips to Grow Tomatoes in Bottles and Pots: Localized urban gardening tips (link)
🍅 Conclusion: Start Growing Tomatoes in Plastic Cans Today
You don’t need a large backyard to enjoy fresh tomatoes. Using plastic cans and bottles, you can grow a thriving tomato garden in even the smallest spaces. This method is:
- Cost-effective: Reduces the need for expensive pots or garden beds.
- Sustainable: Repurposes plastic while producing nutritious food.
- High-yielding: With proper care, pruning, and fertilization, container tomatoes can rival those grown in traditional gardens.
Start today, follow the steps above, and you’ll soon enjoy bountiful homegrown tomatoes, harvested straight from your recycled containers.